
How to Create, Edit, or Upload Stationery?
Directly to the step-by-step guide for placing new stationery
Directly to the step-by-step guide for placing existing stationery
Create or Edit Stationery
If stationery has already been created, it is important to check its usability. Always do this in a test environment. If no digital stationery is available, MKG can create it.
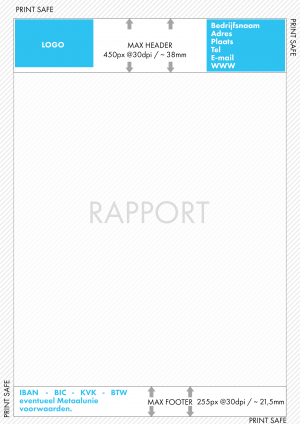
Consider (report) margins
Since reports in MKG take up space, it is important that the layout of the stationery does not fall within the margins of these reports. Also, most printers cannot print to the edges of the paper (so-called bleed). Below is an example of how to consider these different margins. Use this template as a background in programs like Photoshop, Illustrator, or InDesign.
|
Note! |
Step-by-Step Guide: Placing New Stationery in MKG
| 1 | Save the stationery locally (preferably in the MKG document folder). |
| 2 | Open MKG and go to the Language Codes module. |
| 3 | Check if the detail screen is visible. If not, you can easily add it by right-clicking » List settings » Detail » Under. |
| 4 | Select the relevant language in the list for which you want to add stationery. |
| 5 | Go to the 'Stationery' tab. |
| 6 | Check if a detail screen is visible on the right side of this tab. If not: right-click within the 'Stationery' tab » List settings » Detail » Right. |
| 7 | Place the mouse pointer somewhere on the stationery. Two icons will appear in the top left corner of the stationery. Click on the folder icon. |
| 8 | Find the saved stationery, select the file, and click Open. |
| 9 | Click Save . |
Repeat steps 4 to 9 if you also want to add stationery in other languages. Through Language Codes, you can add stationery per language and per administration.
Step-by-Step Guide: Placing Existing Stationery in MKG
| 1 | Open MKG and go to the Language Codes module. |
| 2 | Select the relevant language in the list for which you want to place stationery. |
| 3 | Go to the 'Stationery' tab. |
| 4 |
Check if stationery is visible per language code and administration. • Yes: No further action is needed. |
| 5 | Go to the 'Documents' tab. |
| 6 | If the Physical File field has not yet been added, add it (right-click somewhere in the list » List settings » Field chooser). |
| 7 | Copy the content of the Physical File field. This is your file path. |
| 8 | Return to the 'Stationery' tab. |
| 9 | Click New . |
| 10 | Place your mouse somewhere in the image window and click on the folder icon that appears in the top left. |
| 11 | Paste the copied file path into the File Name field and click Open. |
| 12 | Click Save . |
Repeat steps 2 to 12 if you also want to add stationery in other languages. Through Language Codes, you can add stationery per language and per administration.
Questions
If you have any questions or if you are unable to comply with the above guidelines, please contact MKG. We can always look for a suitable solution.
- Published:24 feb 2026 23:26
- TypeHandleidingen
- Category
- Product
- AvailabilityOpenbaar